
ラズパイにTensorflowをインストールして顔認識できる装置を作成しましたので、紹介したいと思います。このやり方で、人間の顔、猫の顔、たぶん他の動物の顔も認識できると思います。
私の環境では、私の飼い猫はそれなりに識別できるようになりました。お遊び用ですので、ノークレームにてお願いしたいと思います。よろしくお願いいたします。
目的:猫ちゃんの顔を認識させる装置を作る
今回の目的は、ラズパイ+Tensorflowで飼い猫の顔を認識させる装置を作る!です。
使用した設備は下記。私の持っているバージョンは古くラズパイ3ですが、本体もカメラも新しい物でも出来ると思います。
システムフロー
ここでは、本システムのフローを簡単に説明したいと思います。ディープラーニングを用いますので、手順としては、大きく、「学習」と「認識」のプロセスとなります。学習はパソコンで実施し、その学習結果をラズパイへコピーして、ラズパイ上で、その学習結果に基づいて認識動作をする。というのが簡単なフローとなります。まとめると下記。
■学習のフロー(パソコン)で実施
- 大量の写真を準備
- すべての写真の顔部分を切り抜く
- 顔写真にいろいろな画像処理を加え、写真をN増し(ノイズを加えたり、ボケさせたり)
- TensorFlowによる学習
- 学習結果取得
■認識のフロー(ラズパイで実施)
- 学習結果をラズパイへコピー
- ラズパイ上のカメラで写真撮影
- OpenCVで顔検出と顔エリアの切り抜き
- TensorFlowによる認識
- 結果の表示
手順1:学習、評価用写真入手
とにかく沢山の画像を集めます。この量が精度を決めますので、とにかく沢山集めます。出来れば分類(猫A,猫B,猫C…のように)も出来るだけした方が良いですが、時間がかかる為、手っ取り早い方法は、自分の飼い猫の写真とその他、みたいな分け方でもとりあえず大丈夫かと思います。
写真を分類する時は、抵抗が無ければGoogleフォト等を使って、手持ちの写真をまとめて放り投げると、自動分類してくれるので、その後、手で微修正する事で、上手く分類できる場合もあります。(写真によります)
今回の例の場合は、猫だけでなく、人間の顔も含め、猫2匹、人間4人、その他の合計7分類の写真を集めました。
手順2:顔の切り出し
顔の切り出しはPython+OpenCVで一発です。
顔を切り出したい画像があるフォルダに下記2つのファイルをコピーして、名前を付けて保存してください。ターミナルで、上のファイルを実行すると、すべての画像から顔だけを切り抜いてくれます。黄色に示してある部分は、下のファイルのファイル名を入れていただければ大丈夫です。
結果のイメージはこんな感じです。
cmd=ここに下のファイルのファイル名を入れてください.py
echo face crop processing...
for f in *.jpg *.jpeg *.JPG *.JPEG *.png *.PNG
do
	if [ -f $f ]; then
		echo python $cmd $f
		python $cmd $f
	fi
done

echo done
※ファイル名やパスは環境に合わせ任意に設定してください。
import cv2
import sys
import os
from os import path
import math
from math import sin, cos

cascades_dir = path.normpath(path.join(cv2.__file__, '..', '..', '..', '..', 'share', 'OpenCV', 'haarcascades'))

color = (255, 255, 255)

def face_detect(file):
    image = cv2.imread(file)
    image_gray = cv2.cvtColor(image, cv2.COLOR_BGR2GRAY)
    cascade_f = cv2.CascadeClassifier(path.join(cascades_dir, 'haarcascade_frontalface_alt2.xml'))
    cascade_e = cv2.CascadeClassifier(path.join(cascades_dir, 'haarcascade_eye.xml'))

    facerect = cascade_f.detectMultiScale(image_gray, scaleFactor=1.08, minNeighbors=1, minSize=(50, 50))

    # print("face rectangle")
    # print(facerect)
    if not os.path.exists("face_images"):
        os.mkdir("face_images")

    base =  os.path.splitext(os.path.basename(sys.argv[1]))[0] + "_"

    if len(facerect) > 0:
        # filename numbering
        numb = 0
        for rect in facerect:
            x, y, w, h = rect
            # eyes in face?
            y_offset = int(h * 0.1)
            eye_area = image_gray[y + y_offset: y + h, x: x + w]
            eyes = cascade_e.detectMultiScale(eye_area, 1.05)
            eyes = filter(lambda e: (e[0] > w / 2 or e[0] + e[2] < w / 2) and e[1] + e[3] < h / 2, eyes)
            # print(len(eyes))
            if len(eyes) > 0:
                image_face = image[y:y+h, x:x+h]
                cv2.imwrite("face_images/" + base + str("{0:02d}".format(numb)) + ".jpg", image_face)
                numb += 1

if __name__ == '__main__':
    param = sys.argv
    if (len(param) != 2):
        print ("Usage: $ python " + param[0] + " sample.jpg")
        quit()

    face_detect(param[1])
※ファイル名やパスは環境に合わせ任意に設定してください。
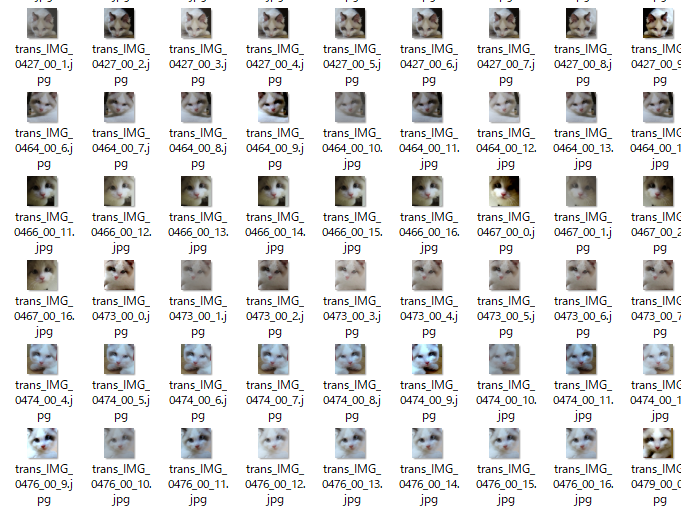
手順3:データのN増し
データのN増しも、OpenCV+Pythonで瞬殺。便利な世の中になりました。
結果は下の図のような感じです。

画像処理の種類としては、
- ボケさせる
- コントラスト変化
- ノイズを印可
- 輝度変化
- 等
といろいろあります。詳しい方は出来るだけ多くの画像処理をいれて、サンプル画像を増やした方が、認識しやすくなりますので、お試しください。
cmd=../../ここに下のファイルのファイル名を入れてください.py

echo processing...
for f in *.jpg *.jpeg *.JPG *.JPEG *.png *.PNG
do
	if [ -f $f ]; then
		echo python $cmd $f
		python $cmd $f
	fi
done

echo done
※ファイル名やパスは環境に合わせ任意に設定してください。
import cv2
import numpy as np
import sys
import os

def equalizeHistRGB(src):

    RGB = cv2.split(src)
    Blue   = RGB[0]
    Green = RGB[1]
    Red    = RGB[2]
    for i in range(3):
        cv2.equalizeHist(RGB[i])

    img_hist = cv2.merge([RGB[0],RGB[1], RGB[2]])
    return img_hist

def addGaussianNoise(src):
    row,col,ch= src.shape
    mean = 0
    var = 0.1
    sigma = 15
    gauss = np.random.normal(mean,sigma,(row,col,ch))
    gauss = gauss.reshape(row,col,ch)
    noisy = src + gauss

    return noisy

def addSaltPepperNoise(src):
    row,col,ch = src.shape
    s_vs_p = 0.5
    amount = 0.004
    out = src.copy()
    # Salt mode
    num_salt = np.ceil(amount * src.size * s_vs_p)
    coords = [np.random.randint(0, i-1 , int(num_salt))
                 for i in src.shape]
    out[coords[:-1]] = (255,255,255)

    # Pepper mode
    num_pepper = np.ceil(amount* src.size * (1. - s_vs_p))
    coords = [np.random.randint(0, i-1 , int(num_pepper))
             for i in src.shape]
    out[coords[:-1]] = (0,0,0)
    return out

if __name__ == '__main__':
    min_table = 50
    max_table = 205
    diff_table = max_table - min_table
    gamma1 = 0.75
    gamma2 = 1.5

    LUT_HC = np.arange(256, dtype = 'uint8' )
    LUT_LC = np.arange(256, dtype = 'uint8' )
    LUT_G1 = np.arange(256, dtype = 'uint8' )
    LUT_G2 = np.arange(256, dtype = 'uint8' )

    LUTs = []

    average_square = (10,10)

    for i in range(0, min_table):
        LUT_HC[i] = 0

    for i in range(min_table, max_table):
        LUT_HC[i] = 255 * (i - min_table) / diff_table

    for i in range(max_table, 255):
        LUT_HC[i] = 255

    for i in range(256):
        LUT_LC[i] = min_table + i * (diff_table) / 255
        LUT_G1[i] = 255 * pow(float(i) / 255, 1.0 / gamma1)
        LUT_G2[i] = 255 * pow(float(i) / 255, 1.0 / gamma2)

    LUTs.append(LUT_HC)
    LUTs.append(LUT_LC)
    LUTs.append(LUT_G1)
    LUTs.append(LUT_G2)

    img_src = cv2.imread(sys.argv[1], 1)
    trans_img = []
    trans_img.append(img_src)

    for i, LUT in enumerate(LUTs):
        trans_img.append( cv2.LUT(img_src, LUT))

    trans_img.append(cv2.blur(img_src, average_square))
    trans_img.append(equalizeHistRGB(img_src))
    trans_img.append(addGaussianNoise(img_src))
    trans_img.append(addSaltPepperNoise(img_src))

    flip_img = []
    for img in trans_img:
        flip_img.append(cv2.flip(img, 1))
    trans_img.extend(flip_img)

    base =  os.path.splitext(os.path.basename(sys.argv[1]))[0] + "_"
    img_src.astype(np.float64)
    for i, img in enumerate(trans_img):
        if i > 0:
            # cv2.imwrite("trans_images/" + base + str(i) + ".jpg" ,cv2.hconcat([img_src.astype(np.float64), img.astype(np.float64)]))
            cv2.imwrite("trans_" + base + str(i-1) + ".jpg" ,img)
※ファイル名やパスは環境に合わせ任意に設定してください。
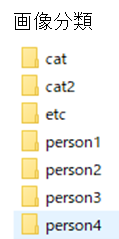
手順4:ラベリング
ラベリングとは、上記手順までで作成した各画像がどの分類の画像かを分類する作業です。これも手作業では非常に手間がかかりますので、スクリプトで実施します。私の場合は、画像の分類は猫2種、人4種、その他、の合計7種という感じにしましたので、画像の分類フォルダとしては下記のような感じになっております。
下のPythonプログラムを実行すると、ラベルファイルが自動的に生成されます。フォルダ名、ファイル名はスクリプトの中を変更し、自分の好きな名前にしていただければと思います。
import sys
import os
import commands
import subprocess

data_dir = '任意のディレクトリ'

def cmd(cmd):
	return commands.getoutput(cmd)

dirs = cmd("ls "+sys.argv[1])
backup_dir = os.path.dirname(os.path.abspath(__file__)) + "/test_buckup_dir"
labels = dirs.splitlines()

print(data_dir)
print(backup_dir)


if os.path.exists(data_dir):
    cmd("rm  -rf "+data_dir)

if os.path.exists(backup_dir):
    cmd("rm  -rf "+backup_dir)


os.makedirs(data_dir+"/images")
os.makedirs(backup_dir)

pwd = cmd('pwd')
imageDir = data_dir+"/images"


train = open(data_dir + '/train.txt','w')
train_lstm = open(data_dir + '/train_lstm.tsv','w')

test = open(data_dir + '/test.txt','w')

labelsTxt = open(data_dir + '/labels.txt','w')
labelsTxt_backup = open(backup_dir + '/labels.txt','w')

classNo=0
cnt = 0

for label in labels:
    workdir = pwd+"/"+sys.argv[1]+"/"+label
    imageFiles = cmd("ls "+workdir+"/*.jpg")
    images = imageFiles.splitlines()
    labelsTxt.write(label+"\n")
    labelsTxt_backup.write(label+"\n")
    startCnt=cnt
    length = len(images)
    print("----file num----")
    print(length)
    print("--------")

    for image in images:
        imagepath = imageDir+"/image%07d" %cnt +".jpg"
        cmd("cp "+image+" "+imagepath)

        print(imagepath)

        if cnt-startCnt < length*0.75:
            train.write(imagepath+" %d\n" % classNo)
            train_lstm.write(imagepath+"\t%s\n" % label)
            print("     ----train data----")
        else:
            test.write(imagepath+" %d\n" % classNo)
            print("     ----test data----")
        cnt += 1
    classNo += 1
※ファイル名やパスは環境に合わせ任意に設定してください。
手順5:学習
次は学習です。CNNのアルゴリズムを使いますが、そのアルゴリズムはTensorflowのものそのものを使います。下のファイルを実行します。その際、もっと下においてある、CNN.pyも忘れないよう同じフォルダに入れて実行をお願いいたします。
import sys
import os
import csv
import time
import cv2
import numpy as np
import tensorflow as tf
import cnn as nn

flags = tf.app.flags
FLAGS = flags.FLAGS
flags.DEFINE_string('train', 'ここにパスを入れてください/任意のファイル名.txt', 'File name of train data')
flags.DEFINE_string('test', 'ここにパスを入れてください/任意のファイル名.txt', 'File name of train data')
flags.DEFINE_string('train_dir', 'ここにパスを入れてください/ここに本ファイルのファイル名を入れてください', 'Directory to put the training data.')
flags.DEFINE_integer('max_steps', 200, 'Number of steps to run trainer.')
flags.DEFINE_integer('batch_size', 10, 'Batch size'
                     'Must divide evenly into the dataset sizes.')
flags.DEFINE_float('learning_rate', 1e-5, 'Initial learning rate.')

if __name__ == '__main__':

    f = open(FLAGS.train, 'r')
    print(FLAGS.train)

    backup_dir = os.path.dirname(os.path.abspath(__file__)) + "/test_data/model"

    if not os.path.exists(backup_dir):
        os.makedirs(backup_dir)

    train_image = []
    train_label = []

    for line in f:
        line = line.rstrip()
        l = line.split()

        print('loading '+l[0])
        img = cv2.imread(l[0])
        img = cv2.resize(img, (nn.IMAGE_SIZE, nn.IMAGE_SIZE))

        train_image.append(img.flatten().astype(np.float32)/255.0)

        tmp = np.zeros(nn.NUM_CLASSES)
        tmp[int(l[1])] = 1
        train_label.append(tmp)
    train_image = np.asarray(train_image)
    train_label = np.asarray(train_label)
    print('---1---')
    print(train_image)
    print('---2---')
    print(train_label)
    print('---3---')
    f.close()

    f = open(FLAGS.test, 'r')
    test_image = []
    test_label = []
    for line in f:
        line = line.rstrip()
        l = line.split()
        img = cv2.imread(l[0])
        img = cv2.resize(img, (nn.IMAGE_SIZE, nn.IMAGE_SIZE))
        test_image.append(img.flatten().astype(np.float32)/255.0)
        tmp = np.zeros(nn.NUM_CLASSES)
        tmp[int(l[1])] = 1
        test_label.append(tmp)
    test_image = np.asarray(test_image)
    test_label = np.asarray(test_label)
    f.close()

    start = time.time()
    csvlist = []
    csvlist.append([])
    csvlist[0].append("step")
    csvlist[0].append("accuracy")
    csvlist[0].append("loss")

    with tf.Graph().as_default():

        images_placeholder = tf.placeholder("float", shape=(None, nn.IMAGE_PIXELS))
        labels_placeholder = tf.placeholder("float", shape=(None, nn.NUM_CLASSES))
        keep_prob = tf.placeholder("float")

        logits = nn.inference(images_placeholder, keep_prob)
        loss_value = nn.loss(logits, labels_placeholder)
        train_op = nn.training(loss_value, FLAGS.learning_rate)
        acc = nn.accuracy(logits, labels_placeholder)

        saver = tf.train.Saver()
        sess = tf.Session()
        sess.run(tf.global_variables_initializer())
        summary_op = tf.summary.merge_all()
        summary_writer = tf.summary.FileWriter(FLAGS.train_dir, sess.graph)

        # train
        for step in range(FLAGS.max_steps):

            #print("----- train max num------")
            print(len(train_image)/FLAGS.batch_size)
            for i in range(len(train_image)/FLAGS.batch_size):

                #print("----- train num------")
                #print(i)
                batch = FLAGS.batch_size*i
                sess.run(train_op, feed_dict={
                  images_placeholder: train_image[batch:batch+FLAGS.batch_size],
                  labels_placeholder: train_label[batch:batch+FLAGS.batch_size],
                  keep_prob: 0.5})

            train_accuracy = sess.run(acc, feed_dict={
                images_placeholder: train_image,
                labels_placeholder: train_label,
                keep_prob: 1.0})
            train_loss = sess.run(loss_value, feed_dict={
                images_placeholder: train_image,
                labels_placeholder: train_label,
                keep_prob: 1.0})

            print("step %d, training accuracy %g, loss %g"%(step, train_accuracy, train_loss))

            # add csv list for graph
            csvlist.append([])
            csvlist[step+1].append(step)
            csvlist[step+1].append(train_accuracy)
            csvlist[step+1].append(train_loss)

            summary_str = sess.run(summary_op, feed_dict={
                images_placeholder: train_image,
                labels_placeholder: train_label,
                keep_prob: 1.0})
            summary_writer.add_summary(summary_str, step)

    elapsed_time = time.time() - start
    print ("elapsed_time:{0}".format(elapsed_time) + "[sec]")

    print("test accuracy %g"%sess.run(acc, feed_dict={
        images_placeholder: test_image,
        labels_placeholder: test_label,
        keep_prob: 1.0}))

    # save model
    save_path = saver.save(sess, backup_dir + "/任意のファイル名.ckpt")

    # save graph data(csv)
    f = open('/任意のディレクトリ/任意のファイル名.csv', 'w')
    dataWriter = csv.writer(f)
    dataWriter.writerows(csvlist)
    f.close()
CNN.pyという名前で下記を保存し、上記ファイルと同じディレクトリに入れてください。下記ファイルの中の「 NUM_CLASSES 」の数字をラベリングした分類数と同じ数字に変更する必要があります。
import tensorflow as tf
import numpy as np

NUM_CLASSES = 7 ←ここはラベリングした分類数と同じ数字に変更してください。
IMAGE_SIZE = 32
IMAGE_PIXELS = IMAGE_SIZE*IMAGE_SIZE*3

def inference(images_placeholder, keep_prob):

    def weight_variable(shape):
      initial = tf.truncated_normal(shape, stddev=0.1)
      return tf.Variable(initial)

    def bias_variable(shape):
      initial = tf.constant(0.1, shape=shape)
      return tf.Variable(initial)

    def conv2d(x, W):
      return tf.nn.conv2d(x, W, strides=[1, 1, 1, 1], padding='SAME')

    def max_pool_2x2(x):
      return tf.nn.max_pool(x, ksize=[1, 2, 2, 1],
                            strides=[1, 2, 2, 1], padding='SAME')

    x_image = tf.reshape(images_placeholder, [-1, IMAGE_SIZE, IMAGE_SIZE, 3])

    with tf.name_scope('conv1') as scope:
        W_conv1 = weight_variable([5, 5, 3, 32])
        b_conv1 = bias_variable([32])
        h_conv1 = tf.nn.relu(conv2d(x_image, W_conv1) + b_conv1)

    with tf.name_scope('pool1') as scope:
        h_pool1 = max_pool_2x2(h_conv1)

    with tf.name_scope('conv2') as scope:
        W_conv2 = weight_variable([5, 5, 32, 64])
        b_conv2 = bias_variable([64])
        h_conv2 = tf.nn.relu(conv2d(h_pool1, W_conv2) + b_conv2)

    with tf.name_scope('pool2') as scope:
        h_pool2 = max_pool_2x2(h_conv2)

    with tf.name_scope('fc1') as scope:
        FC_LAYER_SIZE = IMAGE_SIZE / 2 / 2
        W_fc1 = weight_variable([FC_LAYER_SIZE*FC_LAYER_SIZE*64, 1024])
        b_fc1 = bias_variable([1024])

        h_pool2_flat = tf.reshape(h_pool2, [-1, FC_LAYER_SIZE*FC_LAYER_SIZE*64])
        h_fc1 = tf.nn.relu(tf.matmul(h_pool2_flat, W_fc1) + b_fc1)
        # set dropout
        h_fc1_drop = tf.nn.dropout(h_fc1, keep_prob)


    with tf.name_scope('fc2') as scope:
        W_fc2 = weight_variable([1024, NUM_CLASSES])
        b_fc2 = bias_variable([NUM_CLASSES])

    with tf.name_scope('softmax') as scope:
        y_conv=tf.nn.softmax(tf.matmul(h_fc1_drop, W_fc2) + b_fc2)

    return y_conv

def loss(logits, labels):

    cross_entropy = -tf.reduce_sum(labels*tf.log(tf.clip_by_value(logits,1e-10,1.0)))

    tf.summary.scalar("cross_entropy", cross_entropy)
    return cross_entropy

def training(loss, learning_rate):

    train_step = tf.train.AdamOptimizer(learning_rate).minimize(loss)
    return train_step

def accuracy(logits, labels):

    correct_prediction = tf.equal(tf.argmax(logits, 1), tf.argmax(labels, 1))
    accuracy = tf.reduce_mean(tf.cast(correct_prediction, "float"))
    tf.summary.scalar("accuracy", accuracy)
    return accuracy
※ファイル名やパスは環境に合わせ任意に設定してください。
手順6:学習結果をラズパイへ移動
学習結果をラズパイへ移動させます。ファイルの移動はSAMBA構築とファイル共有が楽だと思いますが、こちらもいくつか参考になるページがありますので、ご参照お願いいたします。
学習によって生成されたファイルすべてをラズパイ側に移動させた後、下のプログラムをカメラを装着したラズパイで実行させます。その時、Tensolflowのインストールと、上記CNN.pyも必要ですので、ファイルは一緒にコピーしておくと便利です。
import sys
import os
import numpy as np
import tensorflow as tf
import cv2
import cnn as nn
from os import path
import picamera
from time import sleep
face_filename = '/tmp/face.jpg'
cascades_dir ='/usr/share/opencv/haarcascades'
def shutter():
photofile = open(face_filename, 'wb')
print(photofile)
with picamera.PiCamera() as camera:
camera.resolution = (640,480)
camera.start_preview()
sleep(1.000)
camera.capture(photofile)
def face_detect():
image = cv2.imread(face_filename)
image_gray = cv2.cvtColor(image, cv2.COLOR_BGR2GRAY)
cascade_f = cv2.CascadeClassifier(path.join(cascades_dir, 'haarcascade_frontalface_alt2.xml'))
cascade_e = cv2.CascadeClassifier(path.join(cascades_dir, 'haarcascade_eye.xml'))
facerect = cascade_f.detectMultiScale(image_gray, scaleFactor=1.08, minNeighbors=1, minSize=(200, 200))
# print("face rectangle")
# print(facerect)
image_face = []
if len(facerect) > 0:
# filename numbering
numb = 0
tmp_size = 0
for rect in facerect:
x, y, w, h = rect
# eyes in face?
roi = image_gray[y: y + h, x: x + w]
eyes = cascade_e.detectMultiScale(roi, scaleFactor=1.05, minSize=(20,20))
if len(eyes) > 1:
if h > tmp_size:
tmp_size = h
image_face = image[y:y+h, x:x+h]
return image_face
if __name__ == '__main__':
labels = []
backup_dir = os.path.dirname(os.path.abspath(__file__)) + "/data/model"
f = open(backup_dir + '/labels.txt', 'r')
print(f)
for line in f:
labels.append(line.rstrip())
images_placeholder = tf.placeholder("float", shape=(None, nn.IMAGE_PIXELS))
labels_placeholder = tf.placeholder("float", shape=(None, nn.NUM_CLASSES))
keep_prob = tf.placeholder("float")
logits = nn.inference(images_placeholder, keep_prob)
sess = tf.InteractiveSession()
saver = tf.train.Saver()
sess.run(tf.global_variables_initializer())
saver.restore(sess, backup_dir + "/model.ckpt")
try:
while True:
shutter()
image_face = face_detect()
if image_face != [] :
print("Face detected!")
img = cv2.resize(image_face, (nn.IMAGE_SIZE, nn.IMAGE_SIZE))
test_image = img.flatten().astype(np.float32)/255.0
test_image = np.asarray(test_image)
pred = np.argmax(logits.eval(feed_dict={
images_placeholder: [test_image],
keep_prob: 1.0 })[0])
print(labels[pred])
finally:
print("program terminated")
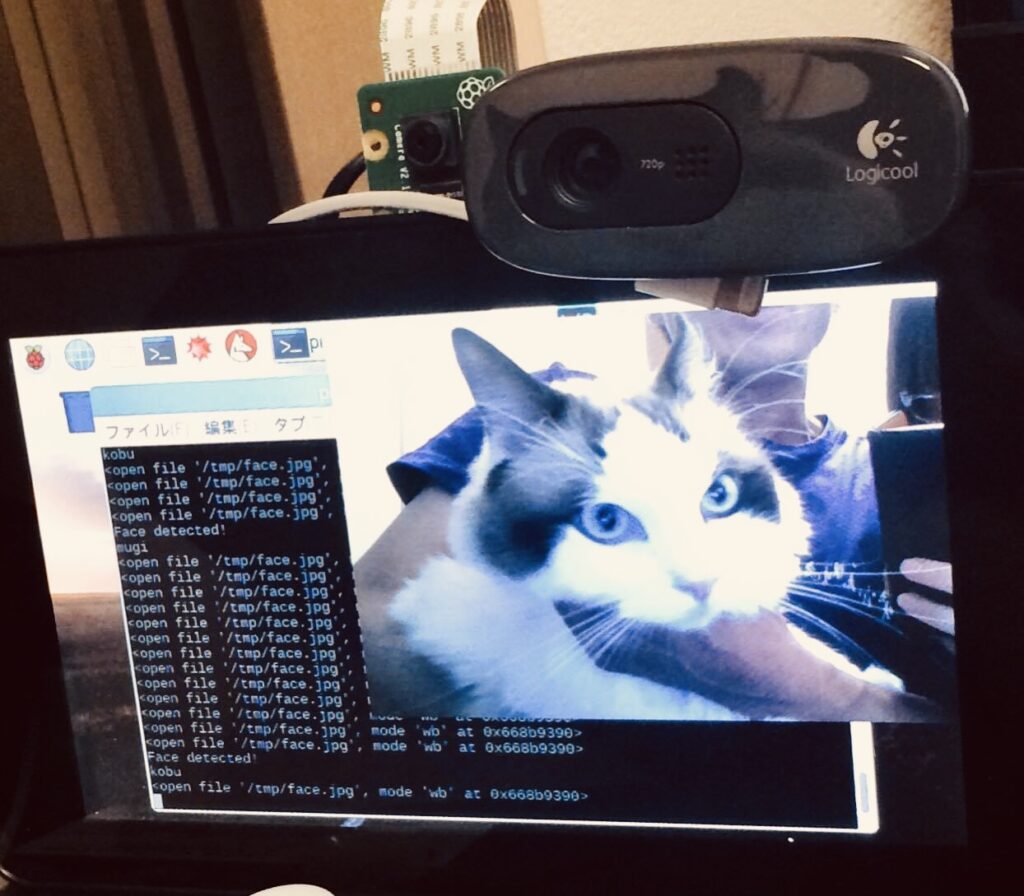
sess.close()手順7:実行
手順6のプログラムを実行すると、下記のように動作し、識別出来る事が確認できると思います。
もし正しく識別できない場合は、一番初めの画像の枚数を増やす事が近道です。私の場合、水増しを入れて1分類約2500枚の画像で実施し、それなりに成功しています。ただそれでも「それなり」なので、精度を上げるには、もっと枚数を増やし、分類も分ける必要があると思います。
環境に応じていろいろ変えなければいけない部分もあると思いますので、ご参考までに、という事でお願いいたします。
※もしかしたら抜け漏れあるかもしれません。すみませんが、あくまで手順の参考という事で、ソースコードに関する内容、上手く行かない場合、ノークレームにてお願いできればと思います。
ラズパイに興味ありましたら、書籍もいろいろありますので、ご参考までに紹介致します。
記事が気に入って頂けたら、クリックして頂けると嬉しいです。
コメント